
Simple Tips for Photographing your Products
Photographing and showing your products is the first step in your sales workflow. Your clients have to see your beautiful albums, prints, image boxes, and other products to get excited about owning those products for themselves.
I teamed up with Michael Ravanelli of Ravanelli Photography to create a guide to help photographers photograph the products available for sale to their clients. This guide is full of helpful tips and how-to’s! Enjoy!!

In Person Sales usually involves selling beautiful printed artwork. We all spend many hours choosing the right labs and materials to work with to deliver the best artwork to our clients.
The question is, are you displaying images of your artwork on your website or social media?
If you answered no, it’s time to start photographing those stunning products that you put so much work into and stand out from other photographers in your area.
Most of us just post images of our clients' sessions, some post behind the scenes, but very few of us showcase our beautiful products regularly
This guide will help you to easily create stunning images of your artwork to attract those clients looking for more than a USB drive with digital files.
You don’t need a large set up or to be a professional product photographer. Use what you have available in your studio and start sharing your hand-selected artwork.
STEP 1: CONSISTENCY
Select one area of your studio or home where you would like to always photograph your products.
Just as you want to be consistent with your clients’ work, you also want to be consistent with your product photos.
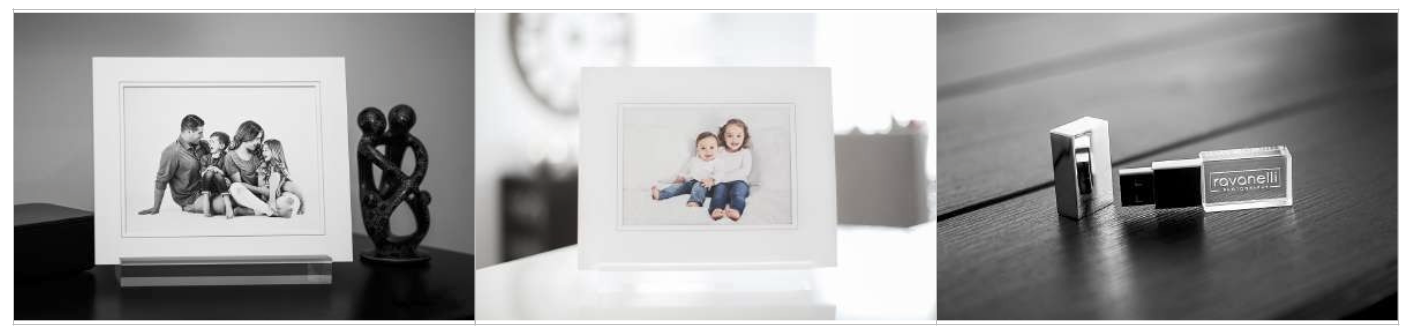
Select a style that matches your brand and look. I do very minimalist work, everything is white. So I choose to photograph my products on a white background, on a white blanket, or white furniture.
Answer these questions for yourself.
What is your style? Minimalist? Earthy? Organic?

You can find great boards with different patterns, both online and local stores, for a low cost. Here are a few suggestions:
PhotoBoards
Etsy
Home Depot
Lowes
Michaels
Joann Arts and Crafts
Hobby Lobby
STEP 2: SET UP BACKGROUND
SWEEP - Infinity curve

Tape a large sheet of paper or vinyl background to the wall. Let it naturally fall to create the perfect curve, also known as ‘infinity curve’. This means your photos will not have a horizon, distracting lines or edges on them. Make sure your surface is bigger than the product itself. This will avoid editing time later in photoshop.

Real World Background
How will this piece of artwork look in my home? This will give the perfect idea how to showcase their products at home.
Dynamic, real-world backgrounds work really well to photograph products that have a specific use, like desk prints, folio boxes, or albums.
Use depth of field to your advantage. Shooting with a low aperture and focusing on your product, you will have a beautifully sharp image of your art, and the background will be out of focus.

Easy and Fast Setup
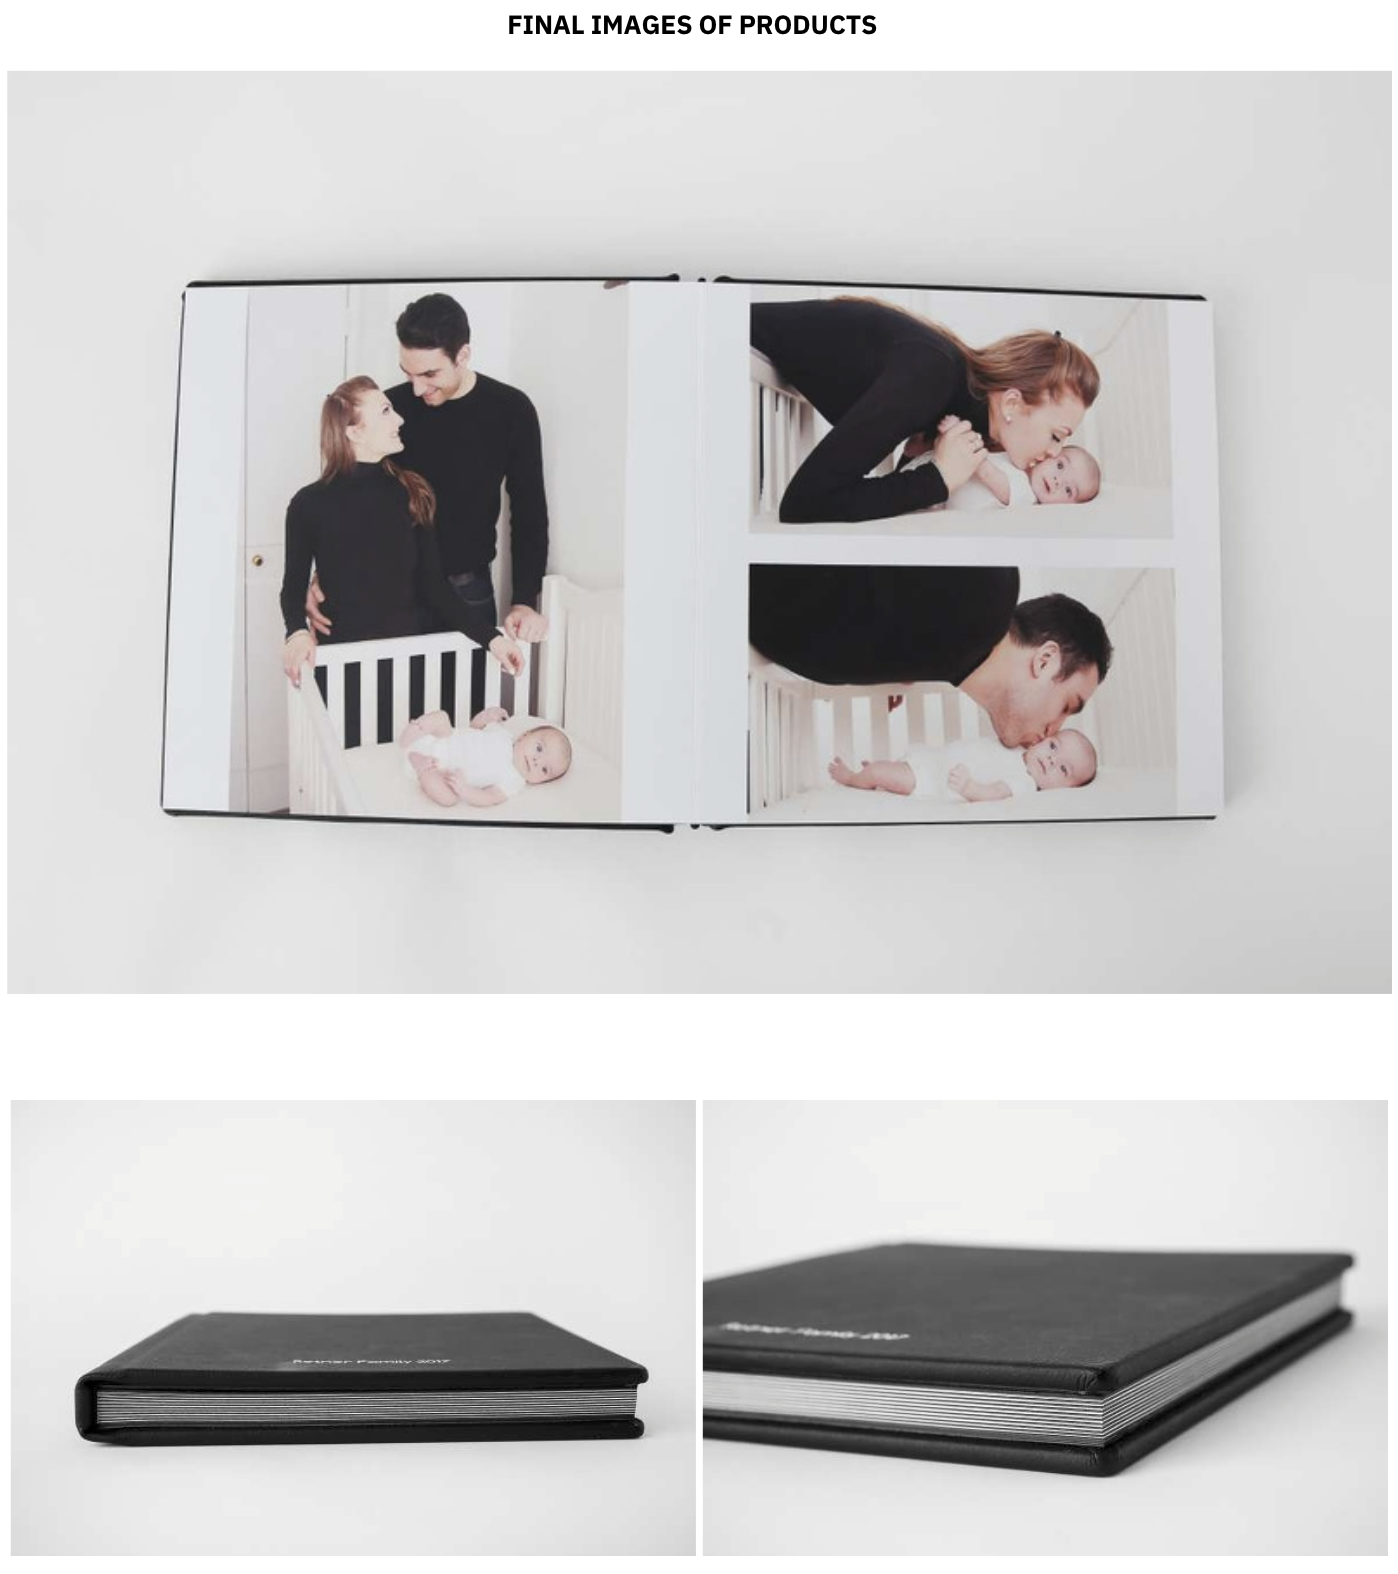
I like to photograph most of my products before they are packaged to take to a client. This allows me to show finished products that I offer, and also, create great product content to posts on my social media accounts.
Your setup doesn't need to be complicated. I quickly photograph mine on a white floor or on my bed. I add blankets and a few props to keep it consistent.

To set up, lay a blanket or piece of material (fabric, wood, etc) that matches your brand anywhere and properly position your product. You don’t need many photos. I always make sure to capture the whole product and a close up, too. One or two images is plenty.

STEP 3: SET UP LIGHTING
I use strobe lighting in my studio to photograph clients. For that reason, I chose to use the same lighting method to photograph my products. It will give the ‘same’ lighting and shadows that my clients are used to seeing in their images.
Strobe & Diffuser
When photographing products for my website or printed materials, I want to have full control of light and shadows. For that reason I use my strobe for a larger source of light. Using a 7ft umbrella, this gives me soft lighting with very minimal shadows for portraits.
The same rule applies for photographing products. Never point a strobe directly at the product. Always feather the light off your products for a more natural look. Feathering is maneuvering a light source’s area of coverage so that only part of the subject, in this case, the product - is lit.

External Flash
For quick photos of everyday products, I choose to use a flash. Combining this method with the Easy and Fast setup you will be able to capture some quick, stunning pictures of your products.
THERE IS ONE RULE for this method. NEVER use the flash pointing straight toward the product. I always adjust my settings to 1/2 or 1/4 power and bounce the light from wall or ceiling.

Natural Lighting
If you photograph only using natural light in your studio, I would stick with this method when photographing your products. Again, consistency is everything.
Natural light has a beautiful softness to it and will yield a spread of light over your products. So find the biggest window or doorway in your studio and turn off any artificial lighting in the room. Avoid windows that have direct sunlight pouring in, as you want soft and indirect light.
Setup is the same for this method. Just place the background facing a large window in your studio.

STEP 4: SET UP PRODUCT & SHOOT
Position your product in your shooting area. Place your product at an angle that is appealing to the eyes. Some products may look flat or boring if shot straight on. Use creativity with angles. Photograph several variations so later you can select the best images, once at the computer.

Start shooting and reposition or rotate your product so you have a range of different angles and viewpoints to choose from, capturing various details.
Make sure you focus on areas that you want to showcase. (Fabric details, satin bows, wood frame, texture of print, etc)

Use the same setup to take a flat (bird’s eye view) photograph from above. Photos taken from a straight line (meaning you in front of the product) are great for dimensional products that can stand up by themselves (ex: desk print, acrylic block, album, etc).

Some products like albums, prints, and mats are best to capture from above or slightly overhead.

5. ADD PROPS & TEXTURES
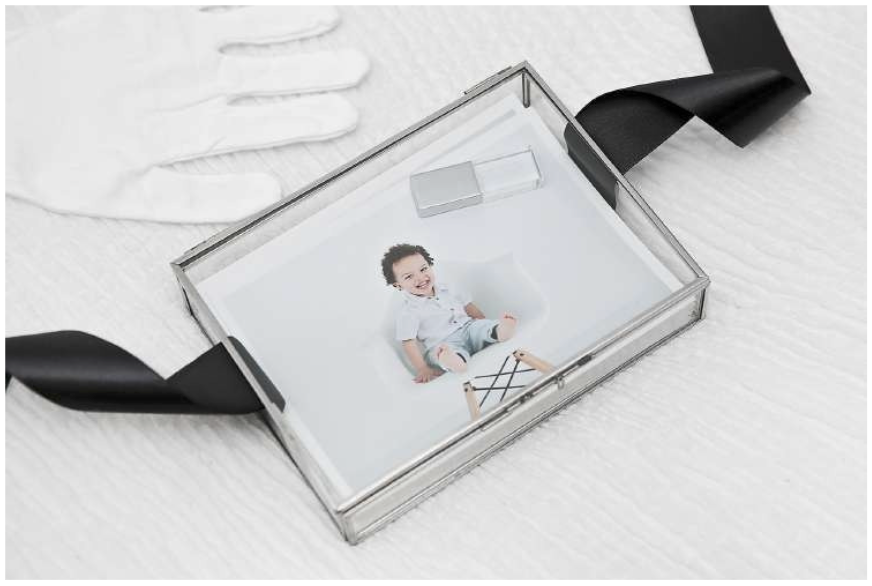
This is the part where you can get creative and play a little bit with your images. Props are great to show the scale of a product and also a great way to make your product more appealing in a home setting.
Look for items that match your brand or go on a little shopping spree. The most important thing is to find props that are relevant to the product you’re showing, otherwise the image won’t make sense.

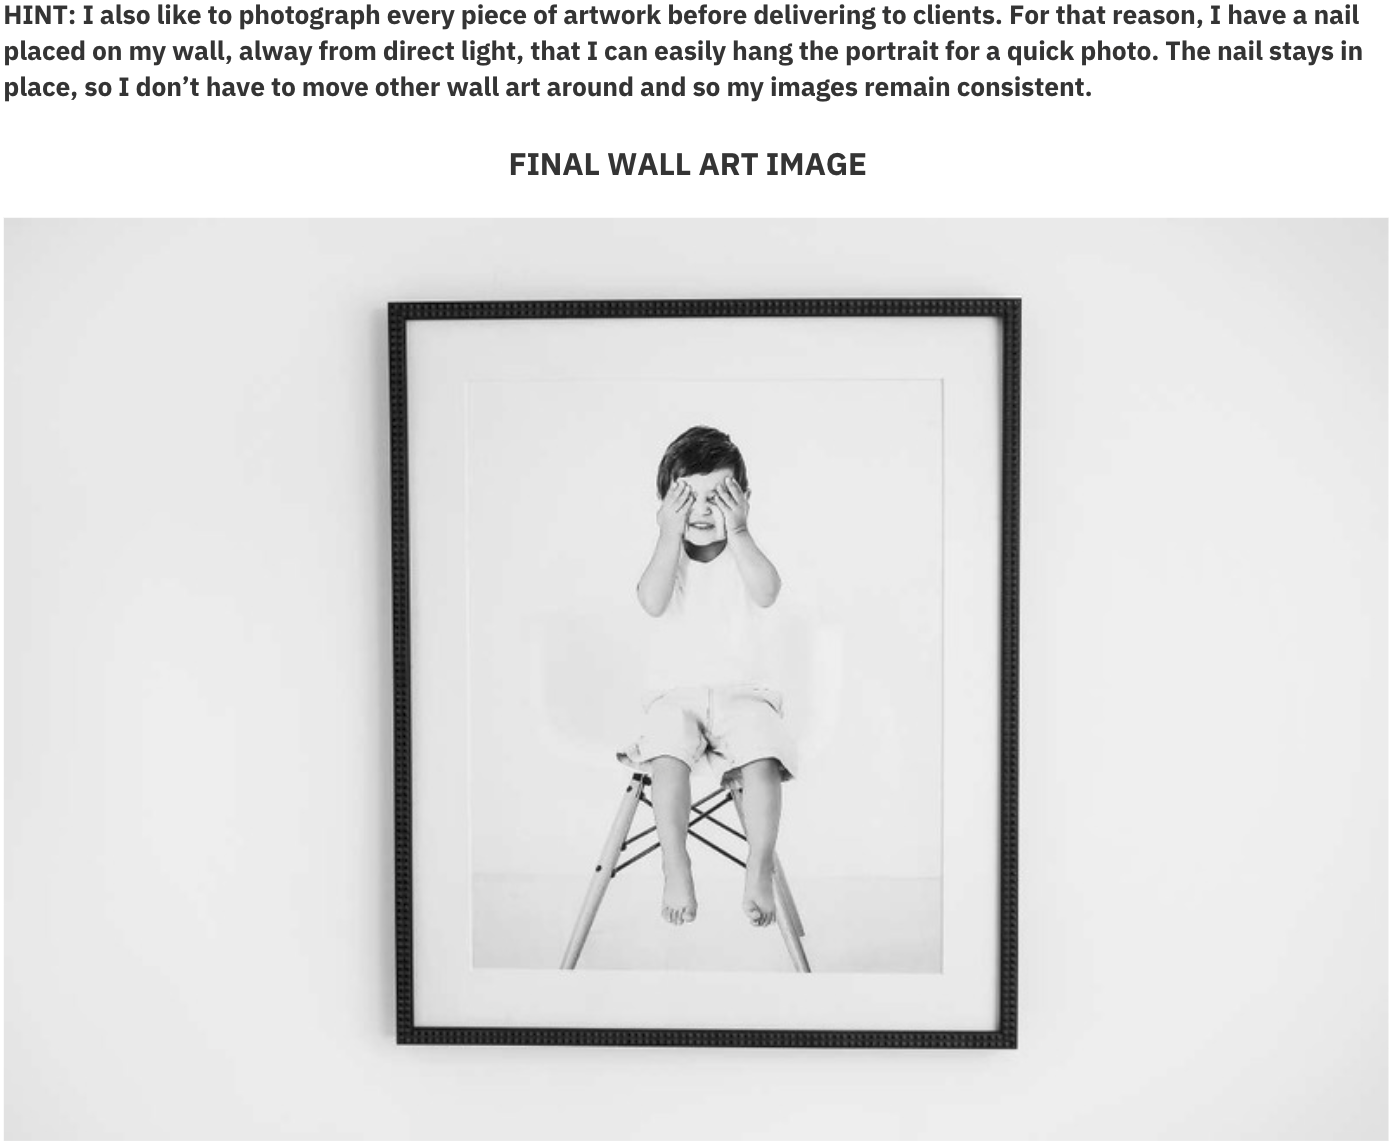
PHOTOGRAPHING WALL ART
Photographing wall art can be tricky. All lighting techniques can be applied here, you just have to be extra careful with pieces that have a very glossy/reflective surface. Your source of light can never be positioned directly in front of gloss or reflective surfaces. I always position my light at around 90-degree angle from my artwork.

USING NATURAL LIGHT
Make sure you position your wall art on a wall that doesn’t have a window or door directly in front of it. Also turn off any overhead lights as these can cause reflections.
USING STROBE OR FLASH
RULE NUMBER ONE applies here as well. Your source of light must be bounced off a nearby wall or ceiling and never pointed directly to the artwork.

DIGITALLY CREATE YOUR ARTWORK
Sometimes we have a few images that we would love to see hanging on the wall of a clients’ home or before we order it. So the solution I found for this problem is to save photos of framed artworks and digitally replace the existing image with your new image.
This can easily be done in Photoshop. Follow these steps.
•Open your image in Photoshop

•Create a shape using the rectangle tool on top of the existing image

•Place the new image on top of your shape layer and Right-click the image and select ‘Create
Clipping Mask’

•Click on Edit - Transform - Scale and adjust image size to your liking.

•Save image and close
FINAL DIGITAL IMAGE

6. DIGITALLY CREATE WALL MOCK-UPS
We don’t always have a chance to photograph our artwork in a client's home or have a fancy room to photograph our samples or new orders in. In today’s digital world, there is always an option. You can easily access hundreds of wall mock-ups online and just add your artwork.
An easy place to start is with Adobe Stock.
Look for ‘Wall Mock-Ups’, then download your favorites and add your artwork.

EDITING YOUR PRODUCT PHOTOS
Now that you have learned to photograph your products, here are a few quick tips to help you make your images even better!
•Use the Dodge Tool to brighten dark areas.
•Use the Burn Tool to darken areas.
•Find a Sharpen action and brush into areas to bring out more details.
•Go to Adjustment>Contracts and adjust to make the material feel more rich

INSPIRATION Find inspiration on props, color combinations, branding and how to position your artwork by looking at professional labs’ websites. Don’t copy. There is nothing wrong with admiring something and trying to achieve it, but use your own creativity to create unique images your clients will love!
